If you’re a blogger, then you know the importance of images. But how to add an image in WordPress?
Did you know that WordPress has built-in tools to help you easily add images to your posts and pages? In this post, I will show you how to use those tools to add images that help improve your blog’s appearance and readability.
Ready for the journey? Let’s get started!
This post may contain affiliate links. Affiliate links are great!
Why? Because by purchasing through these links you to contribute to the growth of this website at no cost to you. Basically, you are helping me grow this blog so I can continue help people like you and me become even more awesome!
For more information please see Affiliate Disclosure.
Why Do I Need Images In WordPress?
A picture is worth a thousand words, and that’s especially true when it comes to WordPress.
Not only do images add visual interest to your posts, but they can also help to break up text and convey information more effectively.
For example, pay attention to this blog article that you are reading right now, do you notice the images (snippets)? Do you notice the added value they provide and how much easier they make it to illustrate what I am trying to say? Let me know in the comments below 🙂
In addition, images can help to boost your website’s search engine ranking and drive traffic to your site. When adding images to WordPress, be sure to use descriptive keywords so that your images are easy to find.
Related: SEO For Content Writing: 13 Strategies For Beginners
How To Add An Image In WordPress Posts
One of the most common questions I get asked is how to add images to WordPress posts. There are two ways to add images to your WordPress posts: via the media uploader, or by embedding them from an external source.
Adding Images To WordPress Posts via the Media Uploader
The media uploader is the easier of the two methods. However, there are small differences depending on the editor you are using in WordPress.
- Classic editor
To get started, simply click on the “Add Media” button that’s located above the post editor.

This will open up the media uploader, which will allow you to select or upload images from your computer or add an image that already exists in the Library.
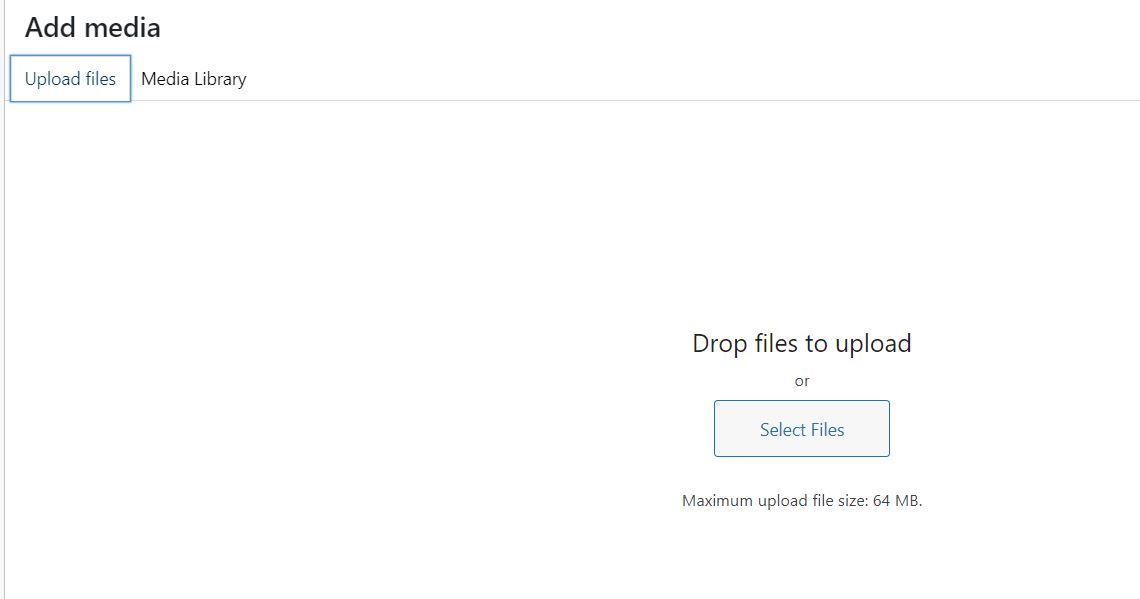
Once you’ve selected the image you want to use, simply click on the “Insert into post” button and they’ll be added to your post.
- Block editor (Gutenberg Editor)
In case you are using block editor or Gutenberg editor, there will be no “Add Media” button. Instead, the block editor is structured in blocks, with each block serving a different function.
Therefore, you would need to add an “Image” block to your post. Click on the ‘plus’ sign and select the image block:
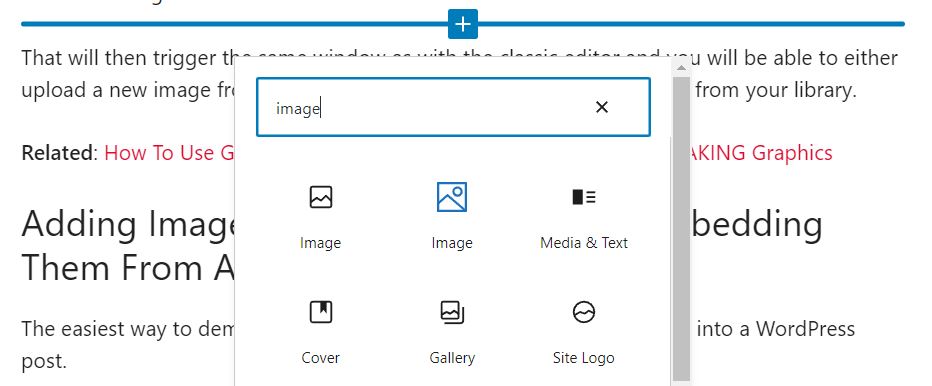
That will then trigger a window asking to either upload an image (directly from your computer), choose media library, or insert from URL.
Related: How To Use Gutenberg Editor In WordPress – Create BREATHTAKING Graphics
Adding Images To WordPress Posts By Embedding Them From An External Source
The easiest way to demonstrate that is by embedding a Pinterest image into a WordPress post.
The first step is to copy the HTML code from the pin:

Once you have copied the code, the next step is embedding it into your post.
- Classic editor
In the classic editor, the first step is to place the cursor where you want your HTML embedding code to go. Usually, that would be a new row.
Next, you need to switch the ‘tabs’ on the top right corner from ‘Visual’ to ‘Text’.

In the ‘Text’ tab (as you have your cursor standing already in the right position), simply paste the code. Don’t worry if it looks ugly, nobody sees that, just you 🙂
As you switch back to the ‘Visual’ tab, your image should appear in the correct place.
- Block editor (Gutenberg Editor)
If you are using Gutenberg editor, you would need to search for the block: ‘Custom HTML’. Then simply paste the code in the block and you are all set!
How To Add An Image In WordPress Pages
This is going to be a very short chapter. The reason for that is that once you know how to add an image in WordPress posts, you also know how to add images to WordPress pages, as the process is exactly the same!
What if I told you that I know just the right platform for you, which offers:
–> FREE HOSTING,
–> 24/7 TECHNICAL SUPPORT,
–> 24/7 LIVE CHAT & COMMUNITY SUPPORT to answer all your questions and brainstorm together,
–> a RESEARCH TOOL showing the exact domain names and their availability,
–> THOUSANDS OF VIDEOS AND TUTORIALS explaining everything you need to know from choosing your niche, picking your domain name, writing content, choosing affiliate marketing programs, etc?
If you answered YES to the above, make sure to check out my #1 RECOMMENDED PLATFORM and Get Started Right Away!
You can either refer to the section above, leave me a comment in the comments section below with your question, or watch my video below where I walk you through the process of how I add images in block editor (or Gutenberg editor).
How To Add An Image In WordPress Widgets
Did you know you can add images to widgets? Wait, to what? What is this… widget?
What Is A Widget?
Widgets are small tools or pieces of code that perform a specific function or task within WordPress.
For example, a widget might display the current weather or a list of recent blog posts, depending on your theme functionalities.
Widgets can be found in the WordPress widgets library, which is accessible from the Appearance > Widgets page in the WordPress admin area. WordPress widgets are typically added to sidebars, but some themes also have widget-ready areas in the footer or other parts of the theme template.
Adding widgets to your WordPress site is a quick and easy way to add more features and functionality. And because widgets are modular, you can easily rearrange them or remove them altogether without affecting the rest of your site.
Adding An Image To A WordPress Widget
- Classic editor
To add a widget in classic editor, you need to go to Appearance > Widgets. From the list of available widgets, select the ‘Image’ widget and drag it to the location of your choice: sidebars, footer, etc.
- Block editor (Gutenberg Editor)
To add an image to a widget in the block editor, under Appearance > Widgets, select the place you would like the widget to be. In my case, I chose the Header:
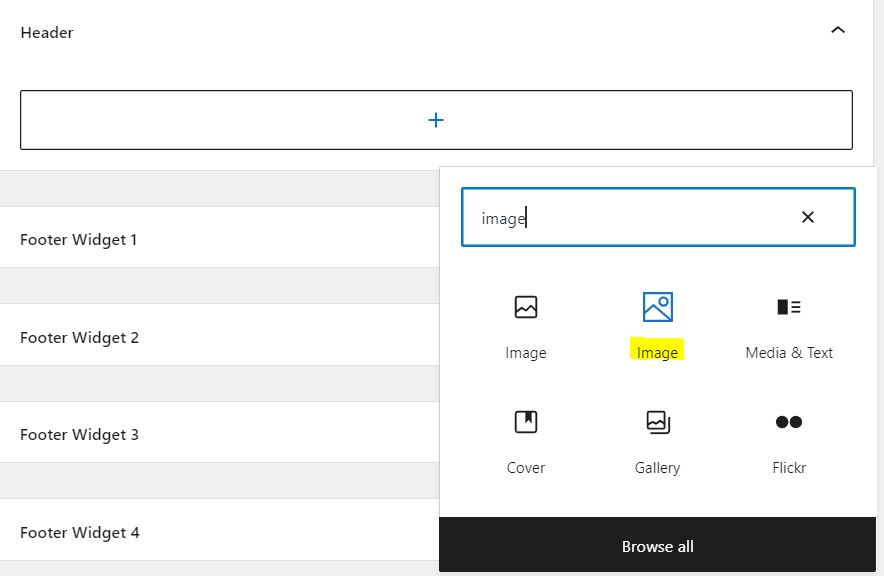
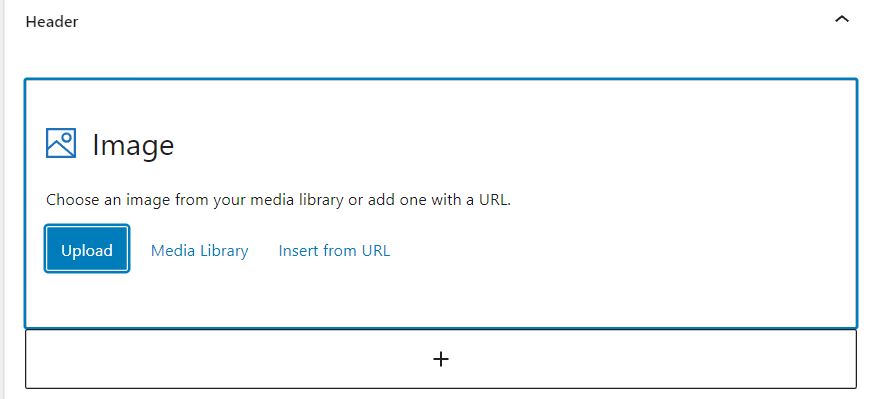
Then simply upload an image from your computer or select an image from your library. That image is now displayed in the header.
If for example, you would have selected the sidebar instead of the header as the position of the widget, every page on your website that has a sidebar will show that image. Pretty cool, right?
Alternatively, you could select the ‘Custom HTML’ block and insert the embedding code for an image.
To Conclude
So, now you know the basics of adding images to your WordPress posts, pages, and widgets. It sounds overwhelming at first maybe, also given the two different processes for both editors that WordPress has available.
However, I can assure you that once you have done it a few times, it will become second nature!
As always, if you have comments or questions for me, feel free to drop them down below and I will get back to you as soon as possible!
Would you like to learn more about WordPress? Are you ready to start your own business and be your own boss? Check out my #1 Recommended Learning Platform for starting your online business!
SAVE and SHARE & SHOW you CARE!
– Tatiana
from My Freedom Hustle
Are you done with your 9-to-5? Looking for a way to express yourself and make money on your own terms?
Look No Further!
Wealthy Affiliate
Wealthy Affiliate is the only platform you need to successfully start and run your online business. This is my TOP RECOMMENDATION for its training, tools, (technical) support and free hosting.



Cheers
Cheers and greetings 🙂